
- What is Golden Hour?
- Why Photograph During Golden Hour?
- Best Techniques for Golden Hour Photography
- Camera Settings for Golden Hour
- Real-World Examples of Golden Hour Photography
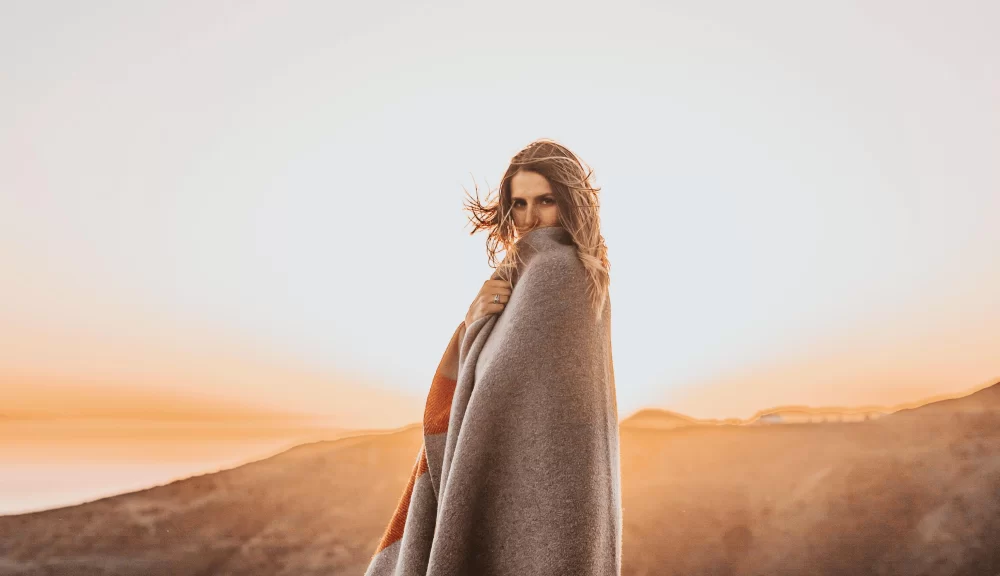
1. What is Golden Hour?
Golden hour refers to the time shortly after sunrise and just before sunset when the sun is low in the sky, casting a soft, warm light. The color temperature of this light is much warmer than midday light, producing rich golden tones that enhance the mood and atmosphere of photographs. During golden hour, shadows are softer, and the light creates a natural glow that makes subjects appear more flattering and picturesque.
Whether you’re a professional photographer or a hobbyist, golden hour is considered one of the best times for outdoor photography due to its unique lighting qualities. This time of day offers a brief window of opportunity to capture stunning images with a soft, diffused light that is hard to replicate at other times.
2. Why Photograph During Golden Hour?
Golden hour provides a unique combination of benefits for photographers, making it a sought-after time for capturing stunning images. Here are a few reasons why photographing during golden hour is a game-changer:
- Soft, Flattering Lighting: The warm, diffused light during golden hour reduces harsh shadows and creates a natural, flattering glow on your subjects, making it ideal for portrait and landscape photography.
- Enhanced Mood and Atmosphere: Golden hour light can infuse your images with a nostalgic or romantic feel, ideal for capturing dreamy or emotional moments.
- Longer Shadows and Texture: The angle of the sun during golden hour creates longer shadows, which can add depth and texture to your images, enriching the composition.
- Perfect for Outdoor Photography: Golden hour is especially beneficial for outdoor and nature photography, providing rich color tones in the sky and landscape that are hard to achieve at other times of day.
3. Best Techniques for Golden Hour Photography
Capturing the magic of golden hour requires more than just showing up at the right time. Here are some key techniques to maximize your photos during this golden window:
- Use the Backlighting Technique: Position your subject between you and the sun to create a stunning silhouette or to capture the beautiful glow around the subject's edges. This technique works especially well for portraits, landscapes, and even architectural shots.
- Embrace Lens Flares: Lens flares during golden hour can add an artistic touch to your photos. Play with angles to introduce sunbursts or hazy light streaks into your composition.
- Capture Reflections: If you’re near water, try capturing reflections of the warm light in the surface. This can add depth and a sense of tranquility to your images.
- Golden Hour Portraits: For portraits, use a wide aperture (such as f/1.8 or f/2.8) to create a shallow depth of field, allowing the soft light to highlight your subject's face while blurring the background in a pleasing way.
4. Camera Settings for Golden Hour
The key to capturing the best images during golden hour is knowing how to set your camera to make the most of the available light. Here are some important camera settings to consider:
- Adjust the White Balance: Set your white balance to "Cloudy" or "Shade" to enhance the warmth of the golden hour light. This setting can bring out the warm tones and prevent images from appearing too cool.
- Use a Low ISO: To preserve image quality and avoid grainy photos, keep your ISO as low as possible (around 100-400), especially since golden hour light is still relatively soft.
- Wide Aperture for Portraits: For portraits or close-up shots, use a wide aperture (such as f/1.4 to f/2.8) to get a beautifully blurred background while focusing on your subject in the soft golden light.
- Shutter Speed for Motion: If you're shooting moving subjects, such as people walking or the wind blowing through grass, adjust your shutter speed to prevent motion blur. A good starting point is 1/500s for fast-moving subjects.
- Experiment with Exposure Compensation: Sometimes golden hour light can trick your camera’s light meter. If your images are underexposed, increase your exposure slightly (+1 to +2 EV) to brighten the shadows without losing detail in the highlights.
5. Real-World Examples of Golden Hour Photography
Let’s look at how some photographers have successfully utilized golden hour to enhance their work. In one famous example, a wedding photographer captured stunning bride and groom portraits during golden hour by using backlighting. The result was a series of romantic images with glowing halos around the couple, perfectly framing the love and intimacy of the moment.
Another photographer, specializing in landscape photography, made use of golden hour to photograph a vast field of flowers. The warm light added richness to the colors of the flowers and created long, dramatic shadows across the landscape, emphasizing the scale and beauty of the scene.
These examples demonstrate the creative potential that golden hour offers for different types of photography. Whether you're shooting portraits, landscapes, or even architectural shots, the key to success lies in understanding how to make the most of the unique lighting conditions during this time.
If you want to get the best gear to enhance your golden hour photography experience, check out Photo Studio for the latest cameras, lenses, and accessories designed to help you capture stunning images at any time of day.


