How to Create Stunning Double Exposure Images: A Step-by-Step Guide
May 13, 2025
1. Understanding Double Exposure Photography
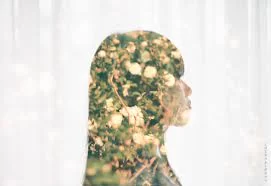
Double exposure photography is a captivating technique that combines two images into one. This artistic style can produce surreal, dreamlike results by merging distinct elements, typically of a person and a landscape, or any combination that creates an engaging visual narrative. The key to successful double exposure photography is the careful selection and blending of images. This technique can evoke emotions, tell stories, or simply add a creative twist to your photography.
Double exposure has been popularized in both traditional film and digital photography. While film photography required exposure to be double-exposed on the same frame, digital photography has made the process far easier with software such as Adobe Photoshop. As we dive deeper into how to create double exposure images, we’ll explore the necessary steps and tips to create mesmerizing results.
2. Preparing Your Images for Double Exposure
Before you start blending images, preparation is key to achieving a smooth and stunning double exposure effect. Here’s how to approach it:
1. Select Compatible Images
The images you choose will largely determine the success of your double exposure. Ideal candidates are images that have contrasting elements, such as portraits with landscapes, or abstract patterns layered over a subject. The composition should allow one image to overlay the other seamlessly.
2. Resolution Matters
High-resolution images are essential for achieving a sharp and professional-looking final product. Ensure that both images have sufficient resolution to avoid pixelation when combining them.
3. Choose a Suitable Editing Tool
Tools like Adobe Photoshop or GIMP are perfect for double exposure photography. These programs offer powerful masking tools, blending modes, and layer options that will allow you to layer and manipulate your images with ease.
4. Consider Lighting and Contrast
To make your images work together, pay attention to the lighting, contrast, and tone of each photo. If one image is dark and the other bright, you may need to adjust brightness or contrast to ensure both images work together harmoniously.
3. Steps to Create Double Exposure Images
Now, let’s dive into the actual process of creating double exposure images:
1. Step 1: Open Your Photos in Editing Software
Start by opening both images in Photoshop or any other editing software of your choice. Make sure that the portrait or subject photo is the primary image, and the secondary image (such as a landscape) will be layered on top.
2. Step 2: Layering the Images
Place your subject image on the bottom layer. Then, place the secondary image (the one you want to blend) on top of the subject image. Adjust the size and positioning of the second image to fit well within the frame.
3. Step 3: Blending the Images
Set the blending mode of the top image to something like “Screen” or “Lighten,” which allows the bottom image to show through while blending both images together. You can experiment with different blending modes to get the desired effect.
4. Step 4: Refining the Image
Use masking tools to erase or reveal portions of the top image where necessary. This step helps to fine-tune the exposure and ensure that the final image has a seamless transition between the two.
5. Step 5: Final Adjustments
After combining the images, adjust the overall color, contrast, and saturation. This can help create a more unified look and enhance the double exposure effect. You might also want to add filters or textures to give the image a more artistic feel.
4. Enhancing Your Double Exposure Creation
To further enhance your double exposure images, here are some techniques you can try:
1. Add Textures or Overlays
Textures like smoke, clouds, or abstract shapes can add an extra layer of depth to your double exposure image. You can overlay these textures and adjust their opacity to integrate them naturally into your composition.
2. Experiment with Colors
Incorporating vibrant colors into your double exposure images can make them pop. Try using color gradients, overlays, or gradient maps to manipulate the color tones and add a dynamic quality to your creation.
3. Use the Correct Composition
A well-composed image will naturally guide the viewer’s eye and tell a better story. Ensure that the primary subject is clearly visible and that the secondary image complements it, rather than overwhelming it.
5. Common Mistakes to Avoid in Double Exposure Photography
While double exposure is an exciting technique, there are some common mistakes to be aware of:
1. Clashing Images
Choosing two images that don’t complement each other can result in a chaotic or unclear final product. Always ensure that the images you select align in terms of theme, composition, and tone.
2. Overuse of Blending
It can be tempting to use strong blending modes or too many layers, but this can quickly make your image appear too busy or overwhelming. Aim for balance and simplicity for the best results.
3. Ignoring the Subject’s Placement
When layering images, make sure the subject of the photo is still the focal point. Avoid letting the secondary image distract too much from the subject.
By avoiding these common mistakes, you can ensure your double exposure images are visually compelling and professionally executed.
Double exposure photography is a unique and creative way to enhance your photos, and with practice, you can master the technique. Whether you’re using it for artistic portraits or dramatic landscapes, this technique allows you to create striking visuals that leave a lasting impression. For the best tools and services to get started, consider visiting Photo Studio, where you can find everything you need to elevate your photography.


